Hi, I’m an artist, homeschool parent, Montessori art trainer and art curriculum developer for children. I’ve spent the last few decades teaching thousands of children through my art studio. Like you, when I first started out I didn’t know where to start teaching even though I went to fine art school! I didn’t know what art lessons to start children with, what area to focus on, or how to teach the art standards. Plus I couldn’t find any Montessori stand alone sequential art curriculum that scaffold correctly. In this post I want to help you understand how to decide on Montessori curriculum, and how to choose the right one for students. I will provide links to where to order Montessori curriculum and choose the right one for your classroom.
When I first started out teaching Montessori Students I became stressed and overwhelmed, I usually had to backtrack art lessons. I would later find out my students needed to understand a step better before we moved to the next step. I bought tons of art books, researched libraries and the web for hundreds of hours looking for Montessori art curriculum ideas. My deepest desire was that my students had joyful creative fun learning. In the beginning I taught too advance. I made things harder than they needed to be, and without realizing I took away creative choices.
After a lot of observation and understanding the child’s sensory system things changed in my teaching. Over time my art curriculum came all together. With an invitation to teach at a Montessori school with a hundred students all in different grades, with limited time. I made the decision to give the same art lesson to all the grades, using the exact lesson. I gave them the same exact demonstration and isolated movement. I followed up with letting my students create what ever they wanted afterwards.
I could not believe the results… every single student engaged from start to finish! I’ve explored this art curriculum with studio practice with huge success. Even my adult learners loved learning this way. I accomplished this by making my lessons more digestible to understand. And even created lessons to flow with common Montessori Great Lessons.
5 Important Montessori Art Curriculum Things I Learned Over Time:
You need to focus on easy step instructions that match the plane they are in.
Montessori guides should plan demos around each new concept.
Each lessons should build onto the next skill set you are teaching.
All foundational key lessons can be taught to both planes of development.
I have tested these curriculums with small to large groups of children of all ages. I now offer proper scaffold sequential organized art lessons in all areas. My curriculums focus on isolated foundational skills sets. I now offer my art curriculum for sale for parent and school guides.
If you are a Montessori guide or parent you don’t have to figure all this out on your own!
No need to jump online to get a bunch of lessons that don’t scaffold leading you to overwhelmed or stress! I created easy to follow curriculum you can purchase. Plus you don’t have to be an artist yourself to follow these lessons!
Order sequential art curriculum, any time printed or digital from a Montessori art expert!
Buy the right Montessori Art Curriculum For Children, Painting & Drawing:
You know visual art education is valuable, however you might not know where to even start—Traditional Montessori certification does not offer how to learn to create art curriculum or how children really learn visual arts.
• Do you dream of having organized art lessons throughout the school year?
• Do you want art projects to support your most important Great Lessons, or Cosmic Education?
• Do you want your students to have work that leads to innovative thinking and independance?
• No prior art knowlege is required to get trained!
• Do you want to do all this without any stress??
That’s why I created:
Get art certified to bring art literacy into the classroom in less than 7 weeks!
Choose from two online training options:
1. Self-paced video training (No certification included)
2. Video training, art certification, one-on-one coaching, and practicum
7 Week Online Digital Course (3 year access!)
Who is This Program For
This training is for anyone who wants to learn how to teach children art lessons or take their art skills and learn how to apply them to teaching children in a Montessori setting.
All types of teachers
This course is designed for guides working with students in early childhood, ages 3-6 or 6-12. It’s a premium online training course that provides focused and up-to-date professional development. Teachers and parents with no Montessori certifications can also register. No prior art training is required.
Art Teaching Blueprint is comprehensive and broad in scope. It lays the foundation for understanding how children learn art, allowing you to start implementing art lessons into your classroom. Art Teaching Blueprint also comes with optional personal development certification and personal coaching.
Improve your teaching skills with a focused visual arts teaching curriculum guided by an expert with 30 years of experience in child art instruction.
International Art Teacher & Author Spramani Elaun
About Instructor:
Spramani Elaun is an author and art curriculum developer from San Diego California. She is a art teacher with a science art methodology. Her success is led by observations and real-life practice of how children cognitively and sensorially process art over thirty years. She is the founder of Nature of Art® Art school & Art supply company, Art Teaching Blueprint Montessori Certification Training.
Sparamani holds degrees in Graphic Design, Digital Media Design, Visual Communications, Print Media, and Fine Arts. She has published seven art education books and five sequential art curriculums for early childhood, lower, and upper elementary levels. She is also a regular exhibitor at the U.S. AMS annual conference and frequently travels internationally for in-service training.
Get Montessori Art Training
Many international Montessori schools and training centers offering Montessori certification have utilized my art in-service personal development training, art digital courses, art curriculums, and consultancy services. Some of our valued customers include The Montessori Accreditation Council on Teacher Education (M.I.T.E), The American Montessori Society (AMS), Association Montessori International (AMI), and MACTE.
Teaching art doesn’t have to be stressful (and you don’t have to be an artist to do it)!
I train you over 7 weeks with my proprietary Science Art Method®
Montessori Art Certification Online Course
This training curriculum not only meets but also exceeds the national and international core arts standards for children. The Art Teaching Blueprint covers the Elements and Principles of Design, the artistic process, and Spramani Elaun’s proprietary Science Art Method® and system of sequences.
Nature of Art® Science Art Method uses 3 key components :
Visual Perception (the visual cortex)
Cognation (Cognitive Neural Network Model)
Phases of Art Development (gross – Fine-motor development)
Here are common struggles Montessori teachers had before taking the Art Teaching Blueprint:
“Learning how to motivate kids to explore art and understanding how to work with different age groups.”
I learned how to simplify my art lessons, and that sculpting and building adds to the young artists 3-dimensional understanding. I have also learned that the process is just as or more important than the masterpiece. I have implemented reflection times into my classes as well, which helps me observe how they create and learn more about my students.“
Kaelee R. – Montessori Guide
Here’s what we’ll cover in 7 weeks:
Lecture 1: Identifying what a quality visual art education is for children (8 videos totallying 40 minutes)
Introduction to visual arts
International art standards
Art language
Teaching Areas of Focus
Artist Techniques
Art Materials
The Artistic Process
Spatial & Dynamic Art Understanding
Lecture 2: How children learn visual arts, Proprietary Science Art Method® (10 videos, totalling 54 minutes)
I share the important patterns I recognized in my 20+ years of teaching visual arts to children. This lecture is all about connecting the science to how kids use their senses to evolve into artists.
3 key components parts to learning visual arts:
Visual Perception
Cognative Art Processing
Gross to Fine-motor
Phases of Art Development
Lecture 3: How to teach children visual arts (11 videos totalling 45 minutes)
I explain what art skills and teaching methods help make children become successful artists. This includes my proprietary system of sequences to help nurture creative development.
Here’s where we get practical! I share my list of the best art supplies to use for teaching each area of visual arts; I also give you the tips and suggested ideas to help you easily teach art for years to come.
Medium
Materials
Demonstrations
Shopping List
Art Supply Prompts
Lecture 5: Art environment (9 videos, totallying 40 minutes)
Set-up
Art Environment
Managing mess
Storage
Staging
Lecture 6: 
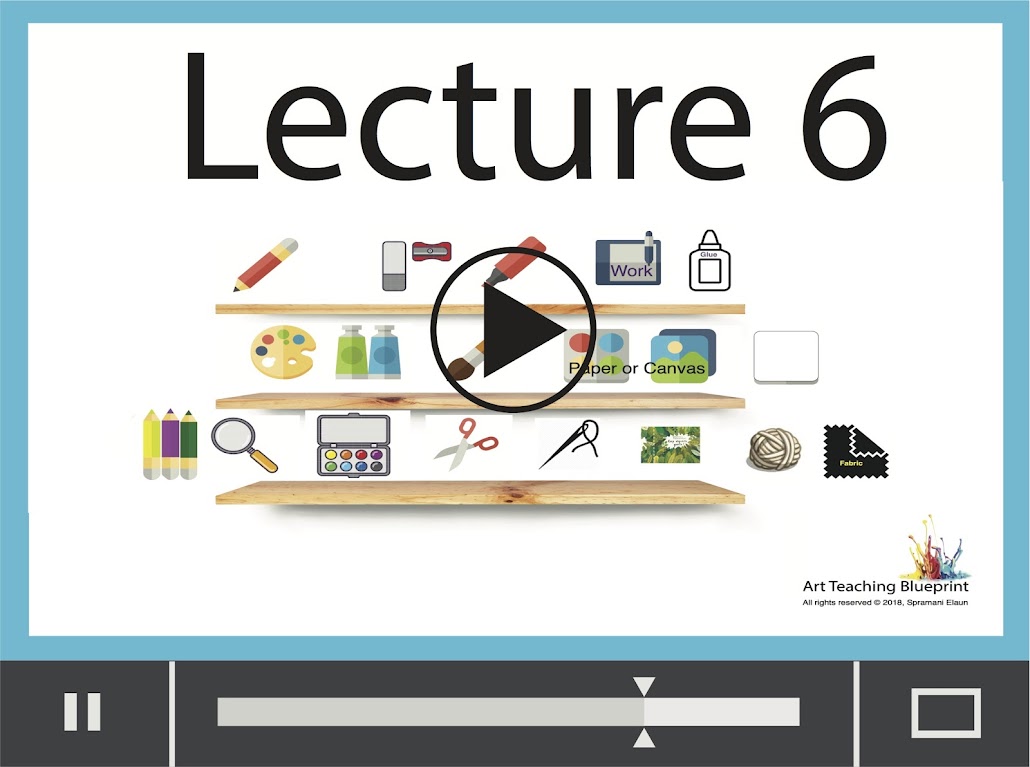
Staging a Montessori art shelf (10 videos, totallying 50 minutes)
A well-staged art shelf can be super powerful! You’ll learn how to set up your art supplies and art shelf to support on-going art literacy and active, engaged, self-learning.
Staging
Material Themes
Focused Group
Independent work
Guided Lessons
Presentation & Demonstration Tip
Lecture 7: Art lessons & planning formulas
This final lecture will help get you in the right mindset to start teaching your students with confidence! I break down how to teaching art lessons so that you can schedule a year’s worth of lessons with ease.
Art Lesson Framework
Art Lesson Development
Scheduling Formula
Art Observation
Making it Montessori
Art Albums
Art Assessment Guides
New trainings added this summer!
Lecture 8: Making it Montessori (1 video)
How to make visual art literacy integrate with the Montessori Pedagogy. Topics:
Sensitive periods
Sensory
Environment
Staging
Montessori Curriculum
Lecture 9: Art Observing (1 video)
Learn what we observe in visual art development, how to use the observation cycle to observe, take notes , assess, and modify art lessons.
No part of this blog may be used or be reproduced in any manner whatsoever including reproducing, publishing, performing, and making any adaptions of the work – including translation into another foreignlanguage without written permission except in the case of brief quotations embodied in critical articles and reviews. Nature of Art® Publishing P.O. Box 443 Solana Beach, California 92075.
I have been getting some good questions from parents and teachers about art routines. So I will be doing a 3 part series explaining my most successful Montessori art routines and expectations.
Art Routines
Art routines can help you not worry about prepping daily, plus stop classroom chaos! When students understand routines they know how to encounter the art space. When you design art routines there’s less guess work for the student. Plus children actually thrive and succeed with routines in place. Outlining routines lays the foundation for actions and expectations from your students.
Montessori art routines can be simple and last only minutes. While others may be complex with students working up to an hour. Children already have routines that start the minute they get out of bed each morning. Like brushing their teeth, dressing, eating, and getting to school. In most cases you usually have your students in routines at the start of the day. So why not set them up for art.
Today I will share what some of these routines look like. I’ll share two key important routines to start with, and the others in part 2 and 3 in this series:
Art Smocks
Art Material Set-up
Art Language
Process-Based
Creative Flow
Art Smock Routine
These routines have worked with tens of thousands of children I’ve worked with. The first expectation is that art is messy and I have a system in place to ensure messes don’t spread around the room. This system keeps wet mediums from spreading around the room or on clothes. I have this conversation before children touch any mediums. Here’s how that might sound.
“Today I thought I would introduce you to the art space I’ve designed to work in, and how to manage the artist materials. The art space is available to those who agree to follow my simple rules.”
With that agreement, then you can move into the smock demonstration.
I explain how messes accrue from spills, hands and splatters. I further explain how the space is designed to manage that type of mess. The first thing I do is introduce the artist’s smock (apron). I explain how artists wear a smock when working on art projects. I explain the function of a smock is to keep their clothes and hands clean. I explain when their hands become spoiled, they will use their smock to wipe them, kind of like a big napkin. I explain that artists do not go back and forth cleaning their hands while working. This helps to keep mediums from spreading around. They stay in their work space and use their smock to manage that type of mess.
I don’t have rags or napkins nearby to wipe with. This eliminates paint, glue or pigmented mediums from smearing around the space. Cleaning hands happens after everything is put away, and they are ready to transition out of art. Then I show them what this action looks like by wiping my hands on my smock. I also show them where to find their smock, how to put it on, and where to return it.
I recommend you have your students always wear a smock or art tee-shirt when working in these spaces. If they are working like an artist, they should dress like an artist. It may take time to implement. But if you keep reminding them, everyone in the class starts to behave artfully.
Material Set-up Routines
Set-up presentations are key and can support your students in many ways. By introducing these routines children will be able to set-up independently. This helps with getting into creative flow states. They will be able to construct and use the materials in artful ways. They will be able to clean-up the materials on their own. They will also take on the responsibility of leaving the materials ready for the next student to use.
So what type of material set-up routines should you introduce to your students:
How to gather art materials
The expectations of how they will work in the art space
How to use tools & mediums properly
Where to store artworks
How to clean up the materials
How to return them for the next student
How to transition out of the art space
Most art activities require students to get everything they need to construct. So beforehand you will need to decide which materials to stage for easy access. Group work is where you set-up stations for students to pick up their materials, or you pass them out. Independent work is when you stage the materials for students to collect on their own. Either way you will have to be sure everything is ready to access. For both you still want to explain the expectations and procedures and order of work flow.
Example: You will gather around the circle so I can discuss the art mediums, how they work, and show art technique. And even share some artist samples. Then direct when it’s their turn to get their materials. How long they work, and where to store completed artworks. How-to return the materials back to their station, how-to be dismissed to put their smock away and wash up.
After you have presented a few times, your students will understand these routines.
Diverse Learners
Chaos happens when students don’t understand their individual role. You might have diverse learners in your classroom. Some might be good at art, but not good at following the linear work flow. In this case you may need to group your diverse learners into a smaller group. To process the instructions slower giving them more time to go through the flow of the activity.
Some might get distracted or confused in larger group commotion. In this case I would recommend you set aside time to work with them in a slower smaller paced group.
You or an assistant can work throughout the work cycle showing them the steps. You may have to slow down every step. Showing them how each step looks like. Picking up the materials, working along side them, and how to store finished artworks. Even how-to gather and clean and return materials. Make time to answer their individual questions. You will eliminate the chaos and your studwents will fall into routines.
If you would like to know more about my art method, check out my books, curriculum and teacher professional development [PD] HERE.
No part of this blog may be used or be reproduced in any manner whatsoever including reproducing, publishing, performing, and making any adaptions of the work – including translation into another foreignlanguage without written permission except in the case of brief quotations embodied in critical articles and reviews. Nature of Art® Publishing P.O. Box 443 Solana Beach, California 92075.